-40%
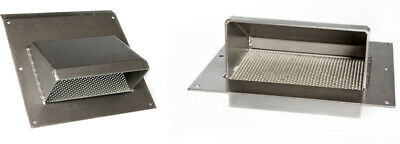
Shipping Container Vent / Insta Shipping Container Vent (PACK OF 2)
$ 105.07
- Description
- Size Guide
Description
Shipping Container Vent / InstaShipping/Storage Container Vent
(PACK OF 2 VENTS)
Using shipping containers as portable storage units is a really popular trend. It’s cost effective, quick to deploy, and containers are readily availble and Allstate Container offers new and used sipping/torage containers
throughout US and the major cities in Canada.
However, there’s one important thing that you’ll have to deal with and that’s moisture and condensation.
As the seasons change you can get really hot days followed by cool nights. As the sun warms the air inside of the container, it builds up moisture. When the evening sets in and the air begins to cool, that moisture is released from the air and collects on the ceiling, walls, and eventually the floor of your shipping container. This can spell trouble if the things that you’re storing will be damaged if they get wet.
There are many ways to manage condensation built up in storage containers, ranging from putting bags of cat litter in side of the container to adding an HVAC system; but the easiest to maintain is simple adding vents. Container vents allow the air to circulate through the container and it maintains a temperature more consistent with the outside. If you’re able to keep the air circulating and fresh, there will be little to no condensation build up.
Container vents come in several shapes and sizes. Turbine vents, or “whirly vents” sit on the top and as the wind blows, they circulate and fan the air through the container. The downside to turbine vents is that they can also allow percipitation to enter the container on a windy or rainy day. Fixed vents are the prefered style of shipping container vents.
Two vents are suggested for heat issues and four for bad moisture issues or extreme heat. So we sell these vents in pack of two (2) vents.
They’ll allow an ample amount of air to circulate through the container and not allow rain or any
rodents or insects
to enter the container.
These vents are designed to be mounted at the top of the container to let the hot air out as heat rises to the top of your container. This helps pull cold air from the floor of the container to the top of the container, drastically reducing heat.
If you’re interested in solving the problem with limited long term costs, and little to no management effort, Insta Vents are way to do it.
These vents with screen are easy to install within 30 minutes. They
have an integrated bug screen to prevent any rodents or insects from entering your container, plus providing great ventilation. Each vent comes powder coated dark gray
for durability
and is designed to be bolt-on so NO welding and NO painting required! Adding vents to your shipping container will help prevent moisture build-up, eliminate dangerous fumes and chemicals that can lead to fire or explosion, and allow optimal airflow. You should vent your container anytime you are storing household items, heavy machinery and automobiles, dry goods, and chemicals/pressurized gasses. It is recommended for each container to have two to six vents, depending on the length of the container.
Specs:
• 13 gage steel construction
•14” H x 14” W x 9” D / 355mm x 355mm x 228mm
• 8.5 lbs. / 4 kg
• Screen: 6” H x 9” W / 152.4mm x 228.6mm
• Powder coated dark gray
Features:
• Tapered in flange to prevent seepage from top
• Easy to install in under 30 minutes
• Integrated bug screen
• Super strong to avoid damage from impacts
• Prevents moisture build up and hazardous fume accumulation
Installation Guide:
Tools Required For Installation:
• PPE – Eye protection, gloves, hearing protection, and ensure not to wear loose fitting clothing
• Step ladder
• Measuring tape
• Marking tool
• Extension cord
• Plasma cutter or angle grinder
• Drill
• Self-Tapping screws
• Driver bit for screws
• Sealant
Installation Steps:
• Ensure all PPE (Personal Protective Equipment) is worn.
• From the top and side of the INSTA Vent take record of the opening measurement.
• Place the vent on the container so the sides of the vent equally overlap the corrugations.
• Mark the two edges and using a straight edge draw a line down on both sides.
• Transfer the opening measurements to the container making sure to center them between the existing two lines
• Create the outline of the opening using a straight edge to connect the four corners.
• Using a metal cutting tool carefully cut along the lines.
• Position the vent in the opening and check the fit to ensure proper alignment.
• Apply a bead of sealant along the left and right sides of the vent.
• Place the vent against the container.
• Using self-tapping screws securely attach the vent.
•Apply a bead of sealant along the top edge of the vent to seal.
• From the inside of the container apply a bead of sealant along the upper and lower edges.
**Installation or fabrication should never be done until you have the product in hand to take exact measurements. Installation may require some fabrication experience and in no way does the warranty cover installation mistakes.
Here is the YouTube Link for the installation video
:
https://www.youtube.com/watch?v=7P6fhZbFoYw
If you have any questions please ask and get an answer first before you buy.
CONTAINERS ARE AVAILABLE NATIONWIDE
*Price varies by location
Please click on my store and
check
out the accessories we sell for these containers.
